Get Started
Get Started with IBM Power for Google Cloud
IBM Power for Google Cloud reduces the complexity of running AIX, IBM i, and Linux on Power by providing a unified platform to deploy compute, storage and networking for IBM Power workloads.
The following guides will help you subscribe to IBM Power for Google Cloud, establish network connectivity, deploy your first Virtual Machine (LPAR), and operate your IBM Power workloads. While a single persona can easily perform these tasks, organizations typically assign Google Cloud IAM Roles and permissions accross three personas.
Typical roles that use these guides include:
- Billing Administrator - A user with Google Cloud Billing permissions who can subscribe to Google Cloud Marketplace services.
- Network Administrator - A user with permissions to create VPC Peering connections in Google Cloud and knowledge of the organizations IP address scheme to aid in IP Address selections for IBM Power workloads.
- Power Systems Administrator - An AIX, IBM i, or Linux on Power administrator who needs to deploy Virtual Machines (LPARs) in IBM Power for Google Cloud.
1 - Before You Subscribe
Information to know before subscribing to IP4G
Before you subscribe to IBM Power for Google Cloud, review the following prerequisites:
- Create a Google Cloud Project. This project will be used to grant access to IBM Power for Google Cloud. See Create and manage projects
- Create a VPC Network. This VPC Network will be peered with IBM Power for Google Cloud via Private Services Access peering. See Create a VPC Network
- Review the Private Services Access documentation. This is how IBM Power for Google Cloud will connect to your Google Cloud environment.
- Identify IP addressing for IBM Power for Google Cloud. Addressing must be Valid IPv4 Ranges in Google Cloud. An IP4G network is associated with one and only one IP4G region. IP addressing in IP4G must not overlap with any IP addressing used in Google Cloud.
2 - Subscribe and Register
How to Subscribe and Register for IBM Power for Google Cloud
This document outlines the steps to subscribe to IBM Power for Google Cloud. It applies to accepting Private Offers and self-service sign-up via the IBM Power for Google Cloud Marketplace listing.
To view a video on the subscription process, see here.
Before you begin
- Billing Account ID - You must know the Google Cloud Billing Account ID that you want to use for the subscription. If you do not know the Billing Account ID, contact your organizations Google Cloud billing administrator.
- Google Cloud IAM Roles - You must have the Billing Account Administrator or both the Billing Account User and the Consumer Procurement Order Administrator IAM roles to subscribe.
- Subscription Project - We recommend creating a project dedicated to the IP4G subscription. This project will be used to provide new users access to your subscription.
- First Region - During registration, you will be asked to select the first region for IP4G. This is the region where your IP4G environment will be deployed. Additional regions can be added later.
- Network Peering Information - You will be asked to provide the VPC name, Project ID, IP subnet, and DNS servers for the first IP4G network. This information will be used to peer your VPC with IP4G.
- Peered VPC Network Name - The name of the VPC Network you want to peer with IP4G
- Peered Project ID - The Project ID hosting that VPC Network
- IP4G Subnet - The IP subnet for the first IP4G network (This must be /24 or larger and must not overlap with your VPC. Subnets can be changed, added, or deleted later.)
- DNS Server - The DNS servers for IP4G VMs (Tip: use
127.0.0.1 initially to avoid timeouts until DNS connectivity is verified. This can be chaned later.)
Subscribe
Option A - Accept Private Offer
Private Offers are created for each new subscription and e-mailed to the customer. Use the Private Offer link to accept the offer.
Continue to the Register section.
Option B - Self-Service Sign-up
- Go to Google Cloud Marketplace → open IBM Power for Google Cloud.
- Select the plan
- Click Subscribe
Continue to the Register section.
Register
- Click Register With Converge Technology Solutions.
- Select the region for your IP4G subscription. Additional regions can be added later.
- Complete the network configuration wizard:
- Region
- Project ID
- VPC Network
- IP Network (CIDR)
- DNS servers
- Copy the provided gcloud commands and complete the network wizard
- Open Cloud Shell and run the commands to establish network peering.
- Registration is complete. It will take up to one business day for the subscription to be activated.
- In the IP4G Web UI left navigation bar (navbar), click Network and create a network using the details used in the network configuration wizard.
- Continue to Add New Users
3 - Add New Users
How to add new users to your IBM Power for Google Cloud subscription
Initially, the Billing Administrator who completed the sign-up process is authorized to use an IBM Power for Google Cloud subscription. Additional users must be authorized to login to IBM Power for Google Cloud. Authorization requires the following.
Assign the new user the Editor IAM Role in the Google Cloud Project associated with the IBM Power for Google Cloud Billing Account.
NOTE: The Editor Role can be removed after the user has been authorized for IBM Power for Google Cloud. Converge recommends using a dedicated Google Cloud Project for authorizing users to access the IBM Power for Google Cloud Marketplace Solution. More about IAM Roles for Google Marketplace solutions can be found here. A restricted set of IAM permissions is under development.
The new user must navigate to the IBM Power for Google Cloud Marketplace solution. Ensure the correct Google Cloud project is selected in the Google Console Project Picker.
NOTE: The Google Cloud project must be linked to a billing account where the IBM Power for Google Cloud plan/subscription has been purchased.
The Marketplace interface should show “Manage on Provider”. If “Manage on Provider” is not shown, verify the correct Google Cloud Project and IAM Roles are assgined.

After the new user clicks “Manage on Provider” they will be prompted to sign into their Google Cloud Identity. Once logged in, they will receive a login error from IBM Power for Google Cloud. The user is now pending authorization. Open a Google Cloud support request with the following content.
“We have granted a new user the appropriate IAM Roles and they have authenticated to IBM Power for Google Cloud using the MANAGE ON PROVIDER button. Please authorize [username@domain.com] for [Account ID]”
To add a ticket, see Create a Support Ticket
4 - Create a Virtual Machine
Create your first virtual machine in IBM Power for Google Cloud
This document walks you through creating your first Virtual Machine in IBM Power for Google Cloud.
LPAR vs Virtual Machine (VM): This document uses the term Virtual Machine (VM) instead of LPAR when referring to AIX, IBM i, or Linux on Power LPAR’s running in IBM Power for Google Cloud (IP4G). All Virtual Machines deploying in IP4G run on native IBM Power hardware as an LPAR. The term Virtual Machine is used because the IP4G control plane manages the compute templates and metadata that turn that LPAR into a Virtual Machine for the customer to manage.
Prerequisites
Accessing Your IP4G VMs with pcloud
pcloud is the command-line tool for managing IP4G (list/create VMs, open consoles, etc.).
Docs: https://docs.converge.cloud/docs/cli/
Install pcloud
Option A — Google Cloud Shell (fastest, no local install)
- Go to Downloads
- Right-click the linux/amd64 URL and copy
- Open Cloud Shell: https://console.cloud.google.com/welcome?cloudshell=true
- Download and extract the Linux/amd64 build:
# Tip: paste the latest linux/amd64 URL from the downloads page
wget https://pforg.converge.cloud/downloads/cli/pcloud-linux-amd64-vX.Y.Z.tar.gz
tar -zxvf pcloud-linux-amd64-vX.Y.Z.tar.gz
mkdir -p ~/bin
mv pcloud ~/bin/
# Ensure ~/bin is in your PATH
echo $PATH
- Authenticate (see below).
Option B — Your workstation (Linux/macOS or Windows via WSL)
- Go to Downloads
- Download the package for your OS/arch and extract it.
- Put the
pcloud binary in your PATH (e.g., /usr/local/bin).
Windows tip: Install WSL for a Linux-like environment, then follow the Linux steps in your distro.
Authenticate pcloud
# Tip: If pcloud is not in PATH but is in the current directory, use ./pcloud
pcloud auth login
- Open the shown URL, paste the device code, complete sign-in.
NOTE: Service Accounts: Using Google Cloud Service Accounts with IP4G is supported for the API/Python client, but not with the pcloud CLI.
Create a VM
# List stock images
pcloud compute images list -a
# copy and paste the ID of the desired stock image
pcloud compute images create <image ID>
# view the image being created, repeat until it is ready
pcloud compute images list
# list networks
pcloud compute networks list
# create VM
pcloud compute instances create <vm_name>   -c .25 -m 8   -i <image_name_or_id>   -n <network_name_or_id>   -t shared -T ssd   -k <ssh_key_name_optional>
# view VM status
pclodu compute instances list
# open console to VM, may take few minutes until the VM has provisioned enough to be successful
pcloud compute instances console <vm_name>
# copy the generated URL into your web browser, log in as root
Verify & Explore Help
pcloud --version
pcloud help
pcloud compute help
pcloud compute instances help
Common discovery:
pcloud compute instances list
pcloud compute images list
pcloud compute networks list
pcloud compute sshkeys list
NOTE: Every pcloud level has contextual help (e.g., pcloud compute instances create --help).
Everyday Tasks
List VMs
pcloud compute instances list
Open early boot console (best for troubleshooting)
pcloud compute instances console <vm_name>
# Copy the generated URL into your browser
Hard reboot (keep the console tab open to capture full boot)
pcloud compute instances reboot --hard <vm_name>
Manage SSH keys
pcloud compute sshkeys create <keyname> -p "ssh-rsa AAAA... my_pubkey"
pcloud compute sshkeys list
Where to Learn More
Network & Connectivity
IBM Power for Google Cloud is connected to your Google Cloud environment via Private Service Access (PSA). There is no external or direct internet access to IBM Power for Google Cloud unless the access is provided by your organizations VPC Network. To allow internet access in IBM Power for Google Cloud you must do one of the following:
- Advertise a 0.0.0.0/0 default route from a Google Cloud Interconnet or Cloud VPN.
- Create a Google Cloud Secure Web Proxy in your peered VPC Network. See Google Cloud Secure Web Proxy
- Create a custom Proxy VM (e.g., Squid on a small GCE VM with egress via external IP / Cloud NAT).
- Create a firewall or router appliance (Palo Alto, Fortinet, or Linux) in the peering VPC Network and advertise a default route to IP4G.
Other Considerations:
- Google Cloue VPC Flow Logs and Google Cloud Firewall are applied to traffic between IP4G and Google Cloud. Not between Virtual Machines in IP4G.
Docs:
Additional Peerings
The initial peering to IBM Power for Google Cloud is created during signup. Customers using multiple VPC Networks or other Google Cloud services such as Google Cloud VMware Engine or Bare Metal Service may need to create additional peering connections to IBM Power for Google Cloud. Additional VPC Network peerings can be created by opening a support ticket. When opening the support ticket, please provide the following information.
- Peered Project Name: The Google Cloud Service Producer Project Name of the existing Private Servies Access peering that is associated with the
ibm-power-for-gcp VPC Network. - Peer VPC Network: The target VPC Network name that you would like to peer with IBM Power for Google Cloud.
- Peer Project Name: The target Google Cloud Project Name that contains the Peer VPC Network you would like to peer with IBM Power for Google Cloud.
Connect to Virtual Machines
Connect to virtual machines from your existing data center or from Google Cloud. We recommend deploying a jumphost in Google Compute Engine.
- Create a small Google Compute Engine (GCE) Linux VM
- Enable IAP and use:
gcloud compute ssh <user>@<vm> --project <proj> --zone <zone> --tunnel-through-iap
- Port-forward as needed:
gcloud compute ssh <user>@<vm> --tunnel-through-iap --ssh-flag "-L localport:destip:destport"
- Optional SOCKS proxy for browser:
gcloud compute ssh <user>@<vm> --tunnel-through-iap --ssh-flag "-D 8080"
Helpful Links
5 - Create a Support Ticket
Engaging support for IP4G
Support for IBM Power for Google Cloud is provided by Google Cloud Customer Care as Third-Party Technology Support using the Collaborative support model.
To learn more about the Third-Party Technology Support provided with Enhanced and Premium support from Google Cloud Customer Care see Getting Support for Google Cloud.
Open a support case for IBM Power for Google Cloud
Requirements:
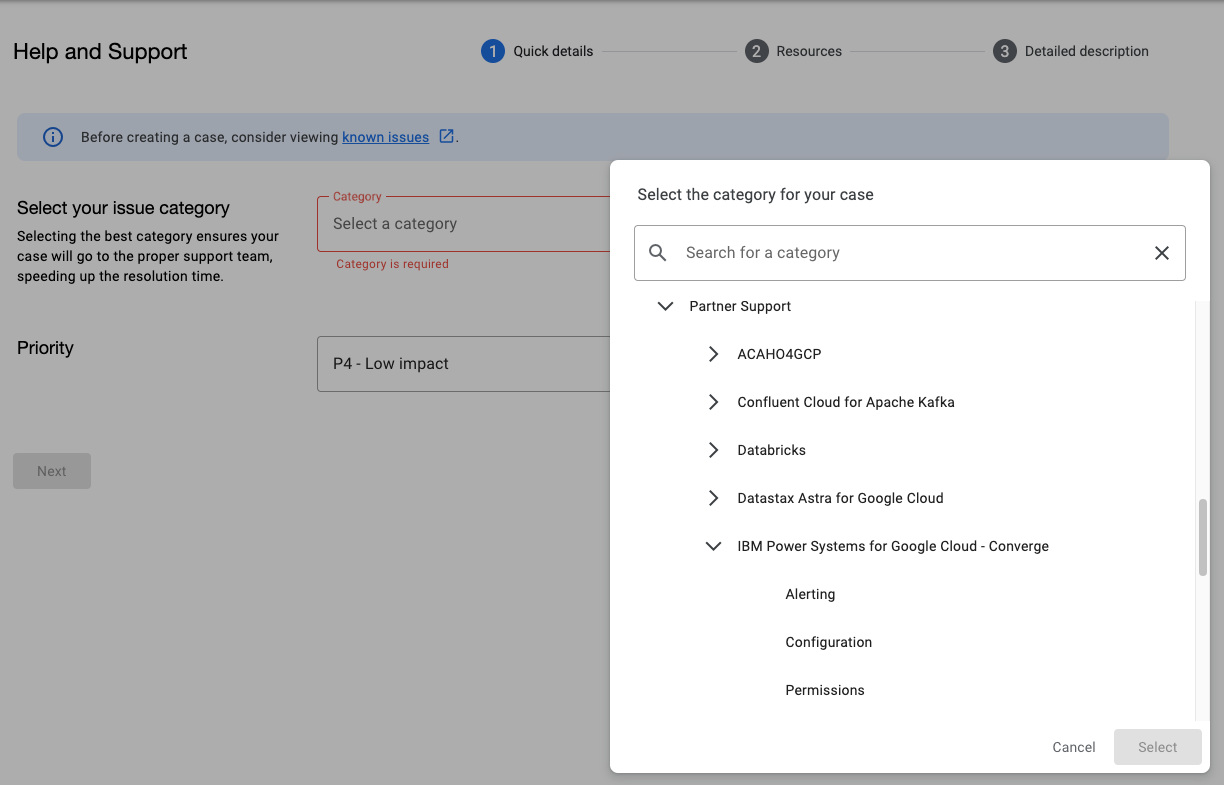
To open a Google Cloud support case, follow the instructions in for Creating cases in Google Cloud Support portal.
When selecting the issue category, expand Partner Support, expand IBM Power Systems for Google Cloud, and select the most appropriate sub topic for your issue.
Google engages Converge on behalf of the client as needed for investigating possible issues with the IBM Power for Google Cloud infrastructure.
If the issue is determined to originate from the operating system or third‑party software, please contact the corresponding vendor’s support team for assistance. For example, for AIX or IBM i issues, see IBM Support.
Open a support case with IBM for AIX and IBM i support
- Support is included for versions of the AIX operating system that are currently in standard support.
- Support is available for versions of the AIX operating system that are in Extended Support. To inquire about pricing for Extended Support pricing or assistance with upgrading to a supported version, please do not hesitate to contact our team at ip4g@pellera.com.
For more information, see AIX support lifecycle information.
To directly engage IBM for AIX or IBM i operating system support, go to the IBM Support portal using your IBM ID. If you do not have an IBM ID, you must register to create an IBM ID.
- Click Open a case
- In the Case Title field, enter a description of the issue.
- In the Product Manufacturer field, select IBM
- In the Product field, select AIX or IBM i
- AIX
- Retrieve the system’s Serial Number, Model, and type. In this example, NNNNNNN is the serial number, 9009 is the Model, and 22A is the type.
root# prtconf | head -2
System Model: IBM,9009-22A
Machine Serial Number: NNNNNNN
- In the Machine Serial Number field, start typing the serial number until a dropdown appears with the option, “I don’t see my serial number. I will enter it manually.” Then select that option.
- Fill in fields as needed.
- In the In the Account field, select the first account in the dropdown.
- In the LPAR Configuration field, select VIOS Client.
- IBM i
- Retrieve the system’s Serial Number, Model, and type. In this example, 21-8FD0W is the serial number, 8286 is the Model, and 42A is the type.
- CALL QLZARCAPI
- Then, on the status line, press F1, then press F10.
- Remove the dash from the serial number.
- On the Type-Model line, the Model is the first four digits before the dash, and Type will be the three digits after the dash.
- Start typing the serial number until a dropdown appears with the option, “I don’t see my serial number. I will enter it manually.” Then select that option.
- Fill in fields as needed
- In the In the Account field, select the first account in the dropdown.
- Complete all of the required information and click Submit Case.
Locate your Account ID
You can find the Account ID in the IBM Power for Google Cloud Web Console or pcloud cli. In the examples below, the Account ID is E-01DF-1DFC-6D14-4701. Using the Web Console, click your name > Accounts to see your Account ID.
Web Console

Using the pcloud CLI.
$ pcloud config list
accountID: E-1A23-4B56-7C89-1234
cloudID: vy6tjjaeucosydnsm5pfopuyioxedqy1
cloudName: my-cloud
region: us-east4
Locate your Cloud Instance ID
Your IBM Power for Google Cloud Account may have multiple Cloud Instances. If you are using two regions, you will have two Cloud Instance ID’s, one for each region. In the example below, the Cloud Instance ID is 75a23c3671c1sjke85788b65552a74ec. To locate the Cloud Instance ID, use the pcloud CLI. If needed, see the instructions for the pcloud CLI.
$ pcloud config list
accountID: E-1A23-4B56-7C89-1234
cloudID: vy6tjjaeucosydnsm5pfopuyioxedqy1
cloudName: my-cloud
region: us-east4